FORMS TUTORIAL AND WORKED EXAMPLES


This section contains four worked examples of Print Control Forms. The first example is a basic one and then the complexity is increased with each example. It is assumed that the reader will study the examples sequentially as later examples do not repeat explanations of commands used. Reference should also be made to the Print Control Forms Reference pages.


EXAMPLE 1


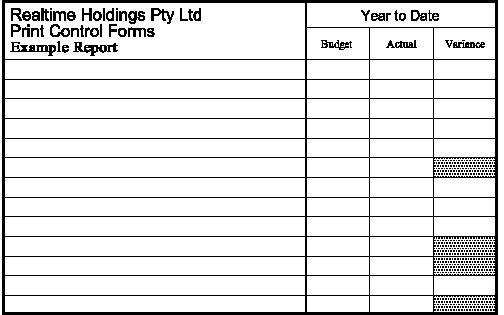
Example 1 - Form created with Print Control Forms.

Forms source code
univers = 52;
times = 5;
normal = 0;
bold = 3;

fill(119.63, 68, 16.33, 5, 15);
fill(119.63, 88, 16.33, 10, 15);
fill(119.63, 103, 16.33, 5, 15);
box(10, 28, 126, 80, 0.7);
vert(87, 28, 80, 0.3);
vert(103.3, 35, 73, 0.1, 2, 16.33);
hor(87, 35, 49, 0.1);
hor(10, 43, 126, 0.1, 13, 5);
font(univers, 12, normal);
text(12, 33, "Realtime Holdings Pty Ltd");
ntext("Print Control Forms");
font(times, 11, bold);
ntext("Example Report");
font(univers, 10, normal);
text(111.5, 33, "c", "Year to Date");
font(times, 8, normal);
text(95.1, 40, "c", "Budget");
text(111.5, 40, "c", "Actual");
text(127.7, 40, "c", "Variance");

What this example shows

In this example you will be shown how to;

  • use the box function to draw a box,
  • use the hor and vert function to draw single and multiple vertical and horizontal lines,
  • use the fill function to shade an area,
  • define a font,
  • use the text command to position text.
  • Explanation
     
    Source code Explanation
    univers = 52;
    times = 5;
    normal = 0;
    bold = 3;
    Define constants which will be used for font selection when the font() function is called.
    fill(119.63, 68, 16.33, 5, 15);
    fill(119.63, 88, 16.33, 10, 15);
    fill(119.63, 103, 16.33, 5, 15);
    The form contains some areas which will not contain data, these are to be
    shaded. The fill() function is used. The first fill pattern is an area to start 199.63 mm from the left margin and 68 mm from the top margin. The area to be filled is 16.33 mm wide and 5 mm deep. The fill pattern is 15% shade. 
    box(10, 28, 126, 80, 0.7); Draw a box starting at 10 mm from left margin and 28 mm from the top margin, 126 mm wide and 80 mm deep, 0.7 mm thick.
    vert(87, 28, 80, 0.3); Draw one vertical line to divide the Year to Date section from the description section. This line is 87 mm from the left margin, also starts 28 mm from the top margin, it is 80 mm long and 0.3 mm thick.
    vert(103.3, 35, 73, 0.1, 2, 16.33); Draw two vertical lines to divide the Year to Date section and create the Budget, Actual and Variance sections. The first line starts 103.3 mm from the left margin and 35 mm from the top margin. The line in 73 mm long and 0.1 mm thick. Two optional parameters are also nominated. These are the number of lines to be drawn, in this case 2, and the distance apart, in this case 16.33 mm.
    hor(87, 35, 49, 0.1); Draw one horizontal line above the Year to Date column descriptions. This line starts 87 mm from the left hand margin, and 35 mm from the top margin. The line is 49 mm long and 0.1 mm thick.
    hor(10, 43, 126, 0.1, 13, 5); Draw the balance of the horizontal lines. The first line starts at 10 mm from the left hand margin and 43 mm from the top margin, each line is 126 mm long and 0.1 mm thick. Two optional parameters are also nominated. These are the number of lines to be drawn, in this case 13, and the distance apart, in this case 5 mm.
    This completes the linework. Now to add text to the form.
    font(univers, 12, normal); Nominate the font to be used. The first text is to use a helvetica (univers) typeface, 12 point size and normal weight.
    text(12, 33, "Realtime Holdings Pty Ltd"); The text command is used to place the first string of text 12 mm from the left margin and 33 mm from the top margin. As there are no previous text commands ragged right margin alignment will be assumed.
    ntext("Print Control Forms"); The next line of text is to be placed starting at the same indent from the left margin and positioned vertically according to the point size being used. The ntext() function is used which indicates that the text is to be located immediately below the previous line using normal line spacing and assuming all of the attributes of the previous text function call. In this case to start 12 mm from the left margin and with ragged right alignment.
    font(times, 11, bold); The next line of text is to use Times Roman typeface, 11 point size and bold weight.
    ntext("Example Report"); Like the previous ntext() function, the next line of text is to be located relative to the last. A ntext() function is therefore used again.
    font(univers, 10, normal); The next line of text is to use a helvetica (univers) typeface, 10 point size and normal weight.
    text(111.5, 33, "c", "Year to Date"); The next string of text is to be centred above the three columns on the right hand side of the form. The centre position is calculated to be 111.5 mm from the left hand margin and the text is to start 33 mm from the top margin. A text() function with the format defined as "c" is used. Using the font typeface and size previously nominated the dimensions of each character that makes up the string of text will be used to calculate how to place the text to centre it 111.5 mm from the left margin.
    font(times, 8, normal); The column headers will use a helvetica (univers) typeface, 8 point size and normal weight.
    text(95.1, 40, "c", "Budget"); The next string of text is to also be centred, this time in the first column of the Year to Date section. Again the text() function is used to centre the text 95.1 mm from the left margin and 40 mm from the top margin.
    text(111.5, "Actual");
    text(127.7, "Variance");
    The final two strings of text are to also be centred in the next column.
    Note: it is only necessary to nominate the offset from the left margin in the last two function calls. The other attributes such as centre text and the distance from the top margin are assumed from the previous function call.

    Running the programme

    To print this example to a laser printer;

    pcf -TPCL < $Utools/Utools/macros/source/pcf_example1 | lp -dlaser
    or to create a PDF file;
    pcf -TPDF < $Utools/Utools/macros/source/pcr_example1 > /tmp/pcf_example1.pdf


    EXAMPLE 2

     
    This example is a header for an A5 size form. This is used as part of Example 3 to construct an A5 size THINGS TO DO form.

    This form comprises a logo, address and box outline. It is designed to be included into another form using the oinclude command and therefore all dimensions are set relative to a starting point 0 0.

    The finished form is shown below.

    Example 2 - Form created with Makeforms commands.
    Forms source code
    univers = 52;
    times = 5;
    normal = 0;
    bold = 3;

    graphic(0, 0, "id-logo-20x20");
    shadebox(0, 21, 127, 10, 0.3, 1, "B", 100);
    offset(80, 1);
    font(univers, 12, normal);
    text(25, 3, "c", "REALTIME");
    text(25, 7, "c", "HOLDINGS");
    font(univers, 8, normal);
    text(25, 10, "c", "PTY. LTD.");
    ntext("18 Moray Street, Bentleigh East");
    ntext("PHONE: +61-419-772121");
    ntext("FAX: +61-3-95034451");
    offset(-80, -1);

    What this example shows

    In this example you will be shown how to;

  • design a form to be included into other forms using the oinclude function,
  • use the shadebox function,
  • use the graphic function to place a logo in the form,
  • use the offset function
  • Explanation
     
    Source code Explanation
    univers = 52;
    times = 5;
    normal = 0;
    bold = 3;
    Define constants which will be used for font selection when the font() function is called.
    graphic(0, 0, "id-logo-20x20"); Include the logo file called "id-logo-20x20" and locate it 0 mm from the left margin and 0 mm from the top margin.
    shadebox(0, 21, 127, 10, 0.3, 1, "B", 100); Draw a shadebox starting at 0 mm from left margin and 21 mm from the top margin, 127 mm wide and 10 mm deep. The line is 0.3 mm thick, and the shadow is 1 mm thick. Finally the shadow is to be on the bottom of the box.
    offset(80, 1); The positioning of the following address text has been created relative to relocated origin. So a single offset function call is used to position the block.
    font(univers, 12, normal); The following lines of text are to use univers typeface, 12 point size and normal weight.
    text(25, 3, "c", "REALTIME"); The text() function is called with "c" format to centre the first string of text 25 mm from the left margin and 0 mm from the top margin.
    ntext("HOLDINGS"); The next line of text is to be placed starting at the same indent from the left margin and positioned vertically according to the point size being used. The ntext() function is used which indicates that it is to be located immediately below the previous line using normal line spacing and assuming all of the attributes of the previous text() function call. In this case the text will be centred.
    font(univers, 8, normal); The following lines of text are touse Univers typeface, 7 point size and normal weight.
    text(25, 10, "c", "PTY. LTD."); The address block is to also be centred under the firm name, but is to be located slightly lower. Therefore a text() function is called with both a x and y position.
    ntext("18 Moray Street, Bentleigh East");
    ntext("PHONE: +61-419-772121");
    ntext("FAX: +61-3-95034451");
    The balance of the address is to be centred relative to the first line of the address.
    offset(-80, -1); Finally, the offset which was applied before the address is reversed by applying negative offset values.

    Running the programme

    To print this example to a laser printer;

    pcf -TPCL < $Utools/Utools/macros/source/pcf_example2 | lp -dlaser
    or to create a PDF file;
    pcf -TPDF < $Utools/Utools/macros/source/pcr_example2 > /tmp/pcf_example2.pdf


    EXAMPLE 3

     
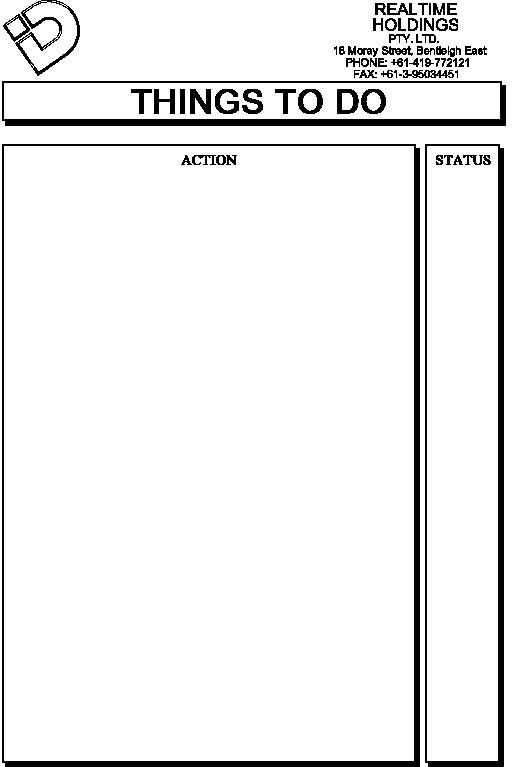
    This example is an A5 size THINGS TO DO form. It includes the form built in Example 2 and adds linework specific to this form.

    The finished form is shown below.

    Example 3 - Form created with Makeforms commands.

    Forms source code
    univers = 52;
    times = 5;
    normal = 0;
    bold = 3;

    offset(10, 5);
    include("$Utools/Utools/macros/source/pcf_example2");
    offset(-10, -5);
    font(univers, 24, bold);
    text(73.5, 34, "c", "THINGS TO DO");
    shadebox(10, 42, 105, 157, 0.3, 1, "B", 100);
    shadebox(117.5, 42, 19, 157, 0.3, 1, "B", 100);
    font(times, 10, bold);
    text(62.5, 47, "c", "ACTION");
    text(127, 47, "c", "STATUS");
    pos(0, 52);

    What this example shows

    In this example you will be shown how to;

  • use the include function to include another file of commands,
  • use text function to place text.
  • draw shadow boxes.
  • importance of the use of the pos function at the end of a form.
  • Explanation
     
    Source Code Explanation
    offset(10, 5);
    include("$Utools/Utools/macros/source/pcf_example2");
    offset(-10, -5);
    The commands created in Example 2 are included to be part of this form. As those commands were designed around a 0,0 reference point it is necessary to use an offset function calls to offset all instructions 10 mm from the left hand margin and 5 mm from the top margin.
    font(univers, 24, bold); The next line of text is to use Univers typeface, 24 point size and bold weight.
    text(73.5, 34, "c", "THINGS TO DO"); The heading text is located using a text function call to be centred within the header box of the included file (Example 2).
    shadebox(10, 42, 105, 157, 0.3, 1, "B", 100); This shadebox is for the Action items. It is drawn starting at 10 mm from left margin and 42 mm from the top margin, 105 mm wide and 155 mm deep. The line is 0.3 mm thick, and the shadow is 1 mm thick. The shadow is to be on the bottom of the box.
    shadebox(117.5, 42, 19, 157, 0.3, 1, "B", 100); This shadebox is for the Status items. It is drawn starting at 117.5 mm from left margin and 42 mm from the top margin, 19 mm wide and 155 mm deep. The line is 0.3 mm thick, and the shadow is 1 mm thick. The shadow is to be on the bottom of the box.
    font(times, 10, bold); The title lines use Times Roman font, 10 point size, bold weight.
    text(62.5, 47, "c", "ACTION");
    text(127, "STATUS");
    The final two text strings are the titles centred in the two shade boxes just drawn.
    pos(0, 52); IMPORTANT: The pos() function is used to position the cursor back to the line on which text will start. This is critical when forms are being used as PCL macros of overlay forms.

    Running the programme

    To print this example to a laser printer;

    pcf -TPCL < $Utools/Utools/macros/source/pcf_example3 | lp -dlaser
    or to create a PDF file;
    pcf -TPDF < $Utools/Utools/macros/source/pcr_example3 > /tmp/pcf_example3.pdf


    EXAMPLE 4

     
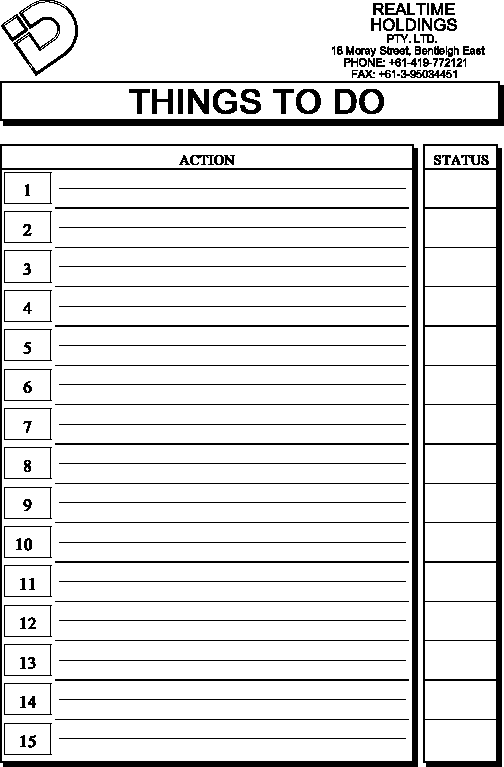
    This example further refines the THINGS TO DO form. It includes the form built in Example 3 and adds linework to create 15 numbered item sections.

    The finished form is shown below.

    Example 4 - Form created with Makeforms commands.

    Forms source code
    univers = 52;
    times = 5;
    normal = 0;
    bold = 3;

    oinclude(30, 0, "$Utools/Utools/macros/source/pcf_example3");
    hor(40, 48, 105, 0.3);
    hor(147.5, 48, 19, 0.3);
    hor(54, 58, 90, 0.2, 14, 10);
    hor(55, 53, 88, 0.1, 15, 10);
    hor(147.5, 58, 19, 0.2, 14, 10);
    font(times, 12, bold);
    _x = 41;
    _y = 49;
    for ( _count = 1; _count < 16; _count++ ) {
        box(41, _y, 12, 8, 0.1);
        text(_x+7, _y+6, "d", format("%d", _count));
        _y += 10;
        if (_count > 9) _x = 42;
    }
    pos(0, 52);

    What this example shows

    In this example you will be shown how to;

  • create multiple horizontal lines in a single command,
  • use a while statement to repetively draw a shape,
  • use the text "d" format to align decimal numbers when it is printed.
  • use an if statement to define a value if a test condition has been satisfied,
  • use variables and assign an initial value,
  • increment a variable,
  • use a formula to define the x and y positions of a text function.
  • use the oinclude function to include another file at an offset,
  • Explanation
     
    Source Code Explanation
    oinclude(30, 0, "$Utools/Utools/macros/source/pcf_example3"); The form created in Example 3 is included to be part of this form. An oinclude function is used to offset Example 3 30mm to the right. Example 3 will also include Example 2 via the include command used in that form.
    hor(40, 48, 105, 0.3); A horizontal line is drawn to box in the title "ACTION". This line starts 40 mm from the left hand margin, and 48 mm from the top margin. The line is 105 mm long and 0.3 mm thick.
    hor(147.5, 48, 19, 0.3); A horizontal line is drawn to box in the title "STATUS". This line starts 147.5 mm from the left hand margin, and 48 mm from the top margin. The line is 19 mm long and 0.3 mm thick.
    hor(54, 58, 90, 0.2, 14, 10); A horizontal line is drawn to divide the ACTION column into 15 sections. One horizontal line is drawn and then repeated 14 times at 10 mm intervals. This line starts 54 mm from the left hand margin, and 58 mm from the top margin. The line is 90 mm long and 0.2 mm thick. It is repeated 14 times at a vertical spacing of 10 mm.
    hor(55, 53, 88, 0.1, 15, 10); This next line divides each section with a 0.1 mm line. This is also defined once for the first section and then repeated 15 times at a vertical spacing of 10 mm.
    hor(147.5, 58, 19, 0.2, 14, 10); This line divides the STATUS column into 15 sections. This line starts 147.5 mm from the left hand margin, and 58 mm from the top margin. The line is 19 mm long and 0.2 mm thick. It is repeated 14 times at a vertical spacing of 10 mm.
    font(times, 12, bold); The font to be used in the item number boxes is set to Times Roman, 12 point size and bold weight.
    _x = 41;
    _y = 49;
    These variables are set to the position of the first number box.
    for ( _count = 1; _count < 16; _count++ ) { This is the start of a loop which will be executed 15 times, during which the variable _count will be incremented from 1 to 15.
    box(41, _y, 12, 8, 0.1); The item number box is drawn The box is to start at the co-ordinates x=41 mm and _y, it is 12 mm wide, 8 mm high and 0.1 mm thick.
    text(_x+7, _y+6, "d", format("%d", _count)); The numeric variable _count is formated into a string which is printed with a text function using decimal ("d") alignment.
    _y += 10; The value of _y is incremented by 10 (10mm).
    if (_count > 9) _x = 42; If the value of counter is greater than 9 then _x is assigned a value of 42. This is done to offset the alignment of the item numbers greater than 9.
    } This is the end of the for loop.
    pos(0, 52); Set the cursor position to the first text line. Refer to Example 3 for a detailed explaination.

    Running the programme

    To print this example to a laser printer;

    pcf -TPCL < $Utools/Utools/macros/source/pcf_example4 | lp -dlaser
    or to create a PDF file;
    pcf -TPDF < $Utools/Utools/macros/source/pcr_example4 > /tmp/pcf_example4.pdf