As part of the restoration of my System/80 computer, I wish to add a TRS-IO module. This project may be a failure, as I am not sure whether the System/80 is too different from a Model 1. It should be OK, so I am willing to give it a try. If successful, this will give the system;
- Access to the RetroStore
- FreHD emulation
- Access to files mounted on a SMB share or located on a micro-SD card
- Access to remote servers via TCP
- Virtual printer support
But the instructions to build the ESP32 code are sparse. No, actually they are virtually non-existent! The only detailed guide I found was on VCF. But even those instructions required many trial and error attempts before I was able to successfully build the code.
So below, under “ESP32 firmware compilation” is a detailed description of everything I have learnt in the process of just building the ESP32 code, which I hope will be useful to others. Only now that I have successfully done that will I embark on the next step of acquiring all the components and attempting to build the hardware.
Gathering the hardware
Originally I planned to build all of this onto a S100 prototyping board installed into the S100 expansion of the System/80. But in reviewing the circuit, I could see that this would not work because the TRS-IO drives the WAIT line from the CPU to pause the Z80 processor, and this signal is not provided in the S100 bus. Furthermore, I did not like the idea of hand wiring all the connections.
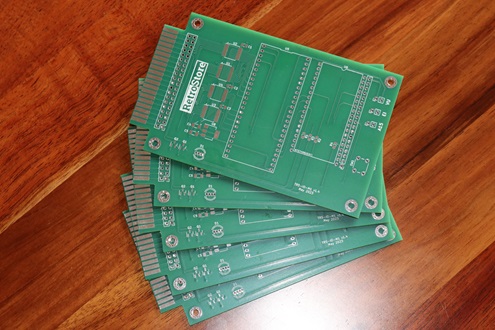
So instead, I have decided to get the PCB fabricated, and I will use the S100 prototype circuit board as a convenient way to mount the PCB within the chassis. All three slots in the S100 expansion unit are already occupied, but the TRS-IO also emulates the top 32kb or RAM, so the existing 32kb RAM board will be redundant and the TRS-IO can use that slot.
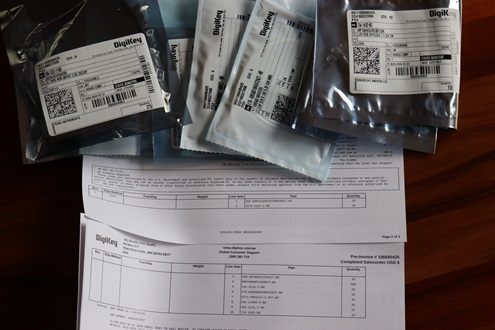
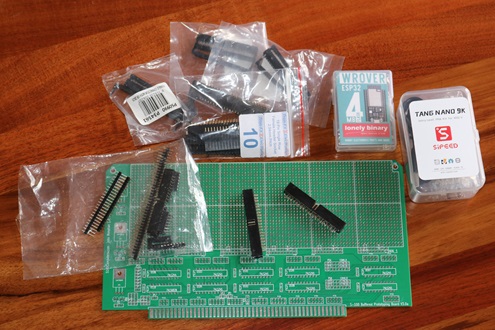
This will also be my first project ever where I will use PCBway for the PCB fabrication and Digikey to order all the parts. Well, I have done that now and I am blown away by the service provided by these companies! The PCBs arrived within a week; same for the componenets from Digikey. I just needed to buy the FPGA and ESP32 (which I already had) plus lots of connectors and the hardware to put it together, so I now have all the parts I need to proceed;
ESP-32 firmware compilation
The VCF instructions referred to using ESP-IDF version 4.3.3, but someone else mentioned that they were successful only with version 4.4. For me, I found I had to use version 4.4.7.
Also, I initially attempted to build it on a Debian WSL instance running on Windows 11. But I had no success with that. So I created a Debian (VirtualBox) VM instance running a Debian 11.5.0 minimal distribution.
Another important thing to be aware of is that the current firmware you will get from GITHUB is configured for the newer TRSIO++ which isn’t presently mentioned in the README on the site. You will need to make changes if you are building the Model1 or Model3 version.
TRS-IO++ version
- This requires an ESP32 module with 32Mb of flash
- You will need to load the “sdkconfig.trs-io-pp” configuration when you run “idf.py menuconfig” prior to building everything
- Ensure “Component config → TRS-IO → Target” is set to “TRS-IO++”
Model 1 and Model 3 versions
- These only require an ESP32 module with 4Mb of flash
- (I am building a Model 1 version and using a 4Mb WROVER module)
- You will need to load the “sdkconfig.defaults” configuration when you run “idf.py menuconfig” prior to building everything
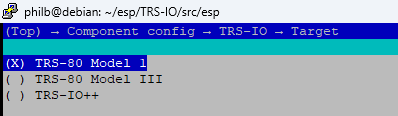
- Ensure that “Component config → TRS-IO → Target” is set properly
Debian 11.5.0 prerequisites
- ## Packages for Espressif
- sudo apt-get install git wget flex bison gperf python3 python3-pip python3-setuptools cmake ninja-build ccache libffi-dev libssl-dev dfu-util libusb-1.0-0
- ## Packages for TRS-IO
- sudo apt-get install z80asm sdcc sdcc-libraries
- ## Some fixes for linking libraries that are needed by TRS-IO
- sudo mkdir -p /lib/z80/
- sudo ln -s /usr/share/sdcc/lib/z80/z80.lib /lib/z80/z80.lib
- ## Python3 as default:
- sudo apt-get install python3 python3-pip python3-setuptools
- sudo ln -s /usr/bin/python3 /usr/bin/python
Check-out and install ESP-IDF
As I progressively tried different platforms and version, I finally got the right combination which seemed to be resulting in a a successful build, only to be presented with the following message at the final step!
“#error Please use ESP-IDF version 4.4.7”
Since others have reported success with different versions as well, I guess that this may change in the future, so watch out for this error!
- ## You will need to create the “esp” folder in your home directory first
- cd ~/esp
- git clone -b v4.4.7 –recursive https://github.com/espressif/esp-idf.git
- ## Install IDF
- cd ~/esp/esp-idf
- export IDF_GITHUB_ASSETS=dl.espressif.com/github_assets
- ./install.sh
Check-out and configure TRS-IO
- ## Check out TRSIO
- cd ~/esp
- git clone –recursive https://github.com/apuder/TRS-IO.git
- ## Setup the build environment
- . $HOME/esp/esp-idf/export.sh
- cd ~/esp/TRS-IO/src/esp/
- idf.py menuconfig
The last command will run the configuration menu, where you will need to load the default configuration for TRSIO and to select the version you are building. The steps are;
- Load (command “O”) the configuration from either;
- “~/esp/TRS-IO/src/esp/sdkconfig.trs-io-pp” for TRS-IO++
- “~/esp/TRS-IO/src/esp/sdkconfig.defaults” for Model 1 and 3
- Confirm which custom partition table CSV file is used;
- “partitions-pp.csv” for TRS-IO++
- “partitions.csv” for Model 1 and 3
- Select your target TRS80 model under the following menu
- Component config → TRS-IO → Target
- Save (command “S”) to ~/esp/TRS-IO/src/esp/build/sdkconfig
- Quit (command “Q”)
Build Everything
- cd ~/esp/TRS-IO
- make clean
- make all
If all goes well, you will have three BIN files
- ~/esp/TRS-IO/src/esp/build/bootloader/bootloader.bin
- ~/esp/TRS-IO/src/esp/build/partition_table/partition-table.bin
- ~/esp/TRS-IO/src/esp/build/trs-io.bin
Commands for a clean re-build
- ## To rebuild ESP-IDF (after logout/login)
- rm -rf ~/.cache/Espressif ~/.espressif
- ## Then “Install IDF” as shown above
- ## To rebuild TRS-IO
- cd ~/esp/TRS-IO
- rm -rf src/esp/build
- make clean
- ## Then “setup the build environment” and “build everything”
Initial flashing and testing
With the code successfully compiled and built, the next step is to flash the ESP32. To do this;
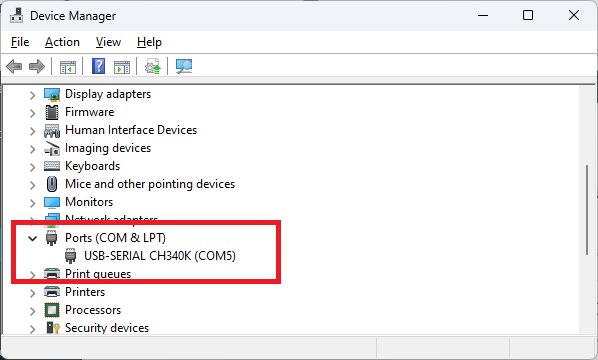
- I attached the module to a USB port of my Windows 11 host machine
- Ran “Device Manager” to confirm that it was recognised by Windows
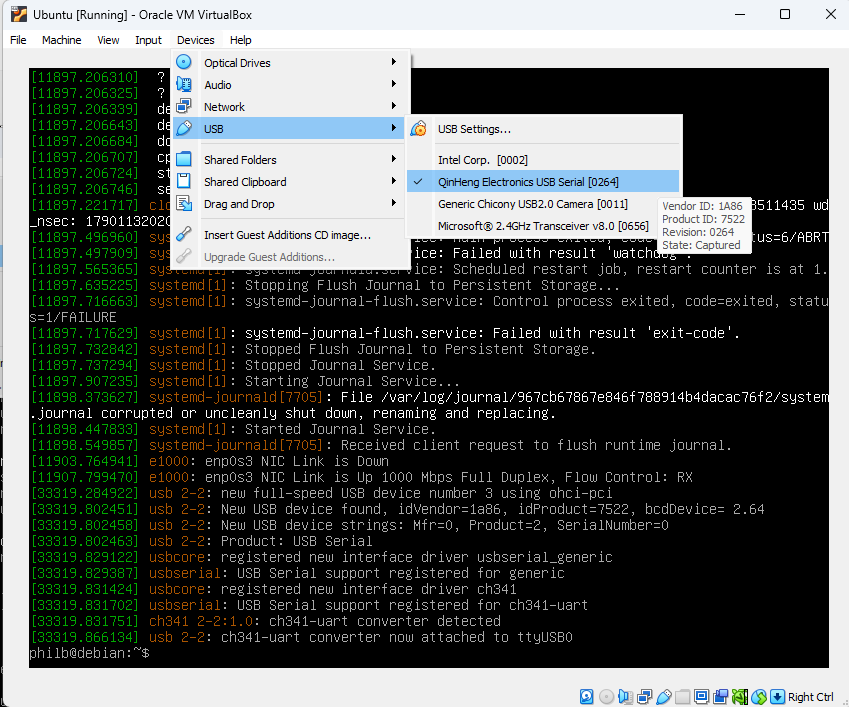
- Attached the USB device to the Debian VM in VirtualBox
- Used “dmesg” to see the device node given in Linux (/dev/ttyUSB0)
- Changed ownership of the device node so I could flash it;
- sudo chown philb /dev/ttyUSB0
- Then executed the command displayed at the end of the build with (PORT) substituted with the device node (/dev/ttyUSB0)
~/.espressif/python_env/idf4.4_py3.9_env/bin/python ../../../esp-idf/components/esptool_py/esptool/esptool.py -p /dev/ttyUSB0 -b 460800 --before default_reset --after hard_reset --chip esp32 write_flash --flash_mode dio --flash_size detect --flash_freq 40m 0x1000 build/bootloader/bootloader.bin 0x8000 build/partition_table/partition-table.bin 0x10000 build/trs-io.bin 0x190000 build/html.bin
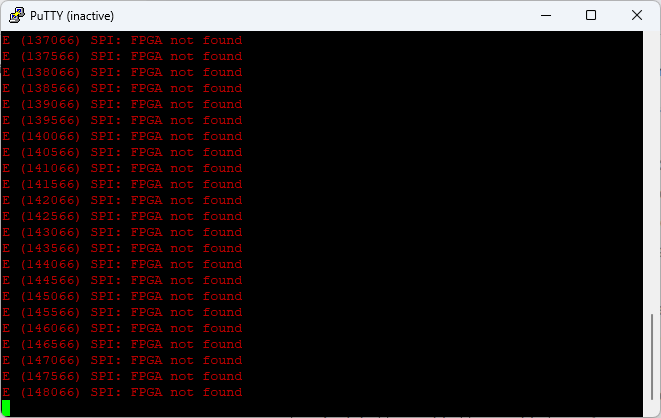
To confirm that the ESP32 modeule was successfully executing the newly flashed code, I connected to the module using “putty” terminal emulator, ie.;
- Connection serial
- Use the COM port shown in Windows Device Manager, e.g. “COM5”
- Set Baud rate to 115200
The terminal showed the message “SPI: FPGA not found”, indicating that the ESP was ruuning and looking for a FPGA. Success!!